Using Auto Exposure
What is Auto Exposure?
Auto Exposure adjusts gain and exposure time to optimize the brightness of the image.
Auto Exposure implemented onboard a camera eliminates the CPU clock cycles needed to optimize exposure settings.
What is Target Grey Value (Exposure Value)?
Target Grey Value is a parameter that helps to compensate for various lighting conditions by adjusting brightness to achieve optimal imaging results. The value is linear and is a percentage of the maximum pixel value. In film photography and in various digital cameras, target grey value is called exposure value and is estimated based on the aperture size, f-stop, and shutter time. Target grey value is logarithmic and a unit change in exposure value doubles the exposure (how bright the image looks).
How to Identify the Correct Exposure
Image pixel intensity is generally represented with n bits. It is common to see 8-, 10-, or 16-bit pixel formats. Monochromatic images have one channel per pixel, and color images usually have three channels (R, G, B) per pixel. The image pixel values are binned in a histogram to display the pixel intensity spread of the image. This qualitative representation indicates when the image is underexposed, correctly exposed, or overexposed. The examples below show an underexposed, overexposed, and correctly exposed image, with the histogram of each image beside it. The histogram is used to determine when an image is at the optimal exposure.
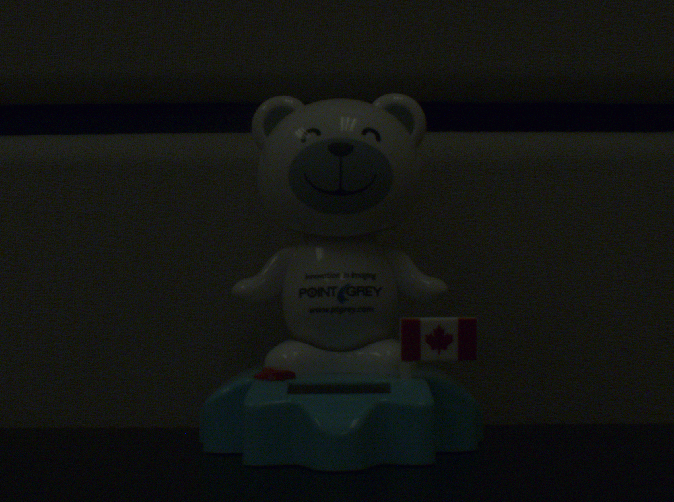
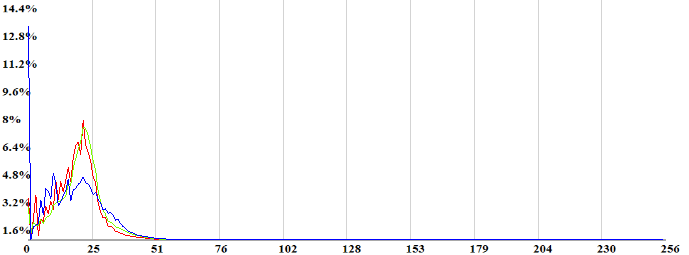
Underexposed: The histogram skews left, meaning the sensor did not capture enough light to properly resolve the dark area.
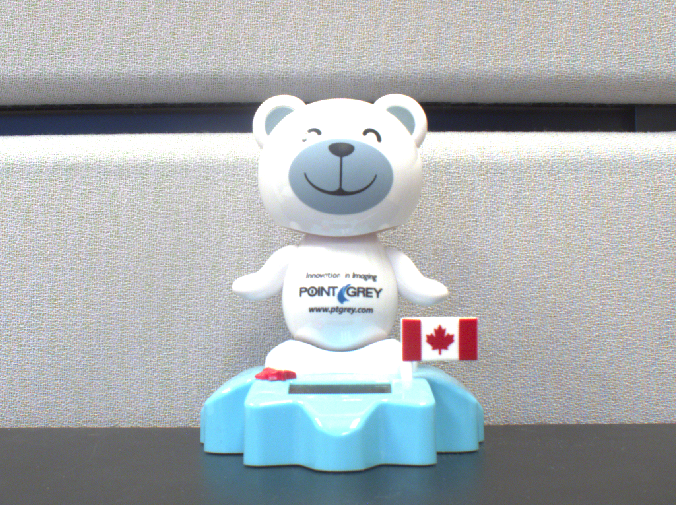
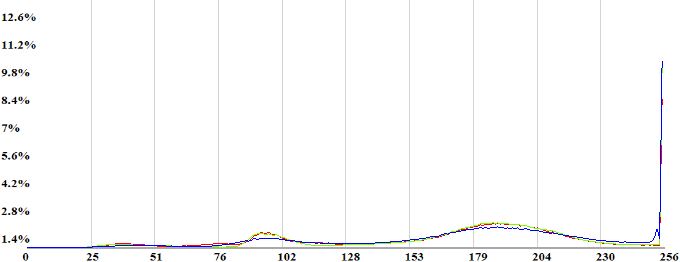
Overexposed: The histogram skews right, meaning that some pixels are oversaturated and information is lost or clipped.
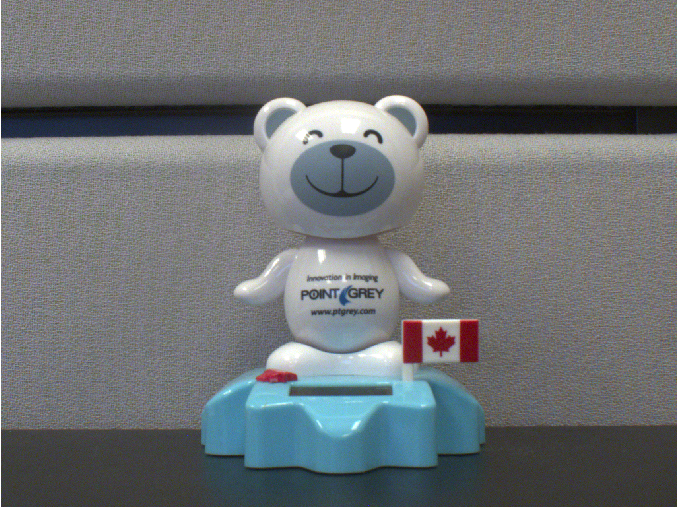
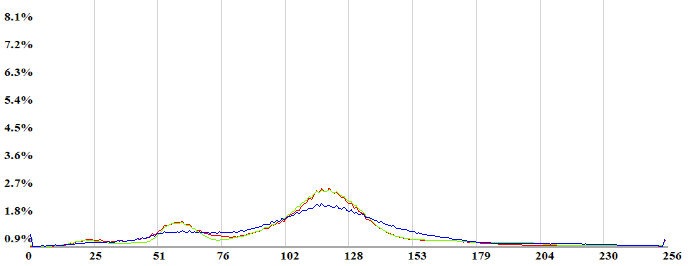
Correct exposure: The histogram mean is near the half pixel saturation value (128) and this image contains the least amount of lost data.
How does Auto Exposure Work?
There are three imaging parameters that affect an image’s exposure. Gain, exposure time (IIDC: shutter), and iris (not a standard GenICam feature). The steps involved in auto exposure are described below.
1. Capture Image
Capture an image at a nominal starting point for exposure and gain.
2. Create Histogram and Compare Statistics
Use histograms to compare the image statistics. The resulting histogram is compared against an optimal mean and variance to determine the optimal exposure. If the mean/variance doesn’t fall within the optimal range, gain or exposure is then adjusted by the camera. Below is a diagram of the feedback loop in determining the optimal exposure for an image.
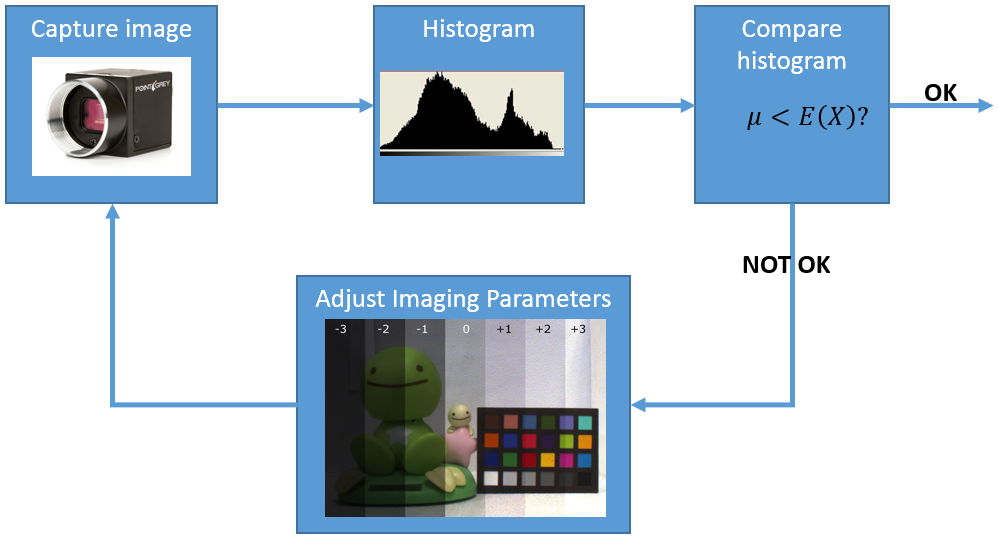
You can set the optimal image mean automatically or define it with the Target Grey Value, which controls where the image histogram mean lies. Target grey value is a percentage of the pixel format’s maximum value. For example, for an 8-bit pixel format with a target grey value set at 50%, the gain and exposure adjust automatically to set the histogram mean at 128 before any non-linear functions, such as gamma or LUT, are applied to the image exposure.
When Target Grey Value is set to Automatic, the camera determines the best mean based on the image variance. In this mode, Gain, Exposure, and Target Grey Value can be configured to a lower and upper limits as well.
When Target Grey Values is set to Off, you may define the preferred mean. You may also define the mean by using exposure value (EV) compensation. This options works with Target Grey Values turned on or off.
EV compensation is a way to manually adjust the target grey value to accommodate particular situations where the lighting creates unusually dark or light subjects, such as bright sunlight or shadow. EV compensation uses numbers ranging from -3 to 3. Each unit increase doubles the brightness of the auto exposure algorithm.
3. Adjust Gain and Exposure Time
Adjust the imaging parameters of gain and exposure time when the image statistics do not match the target grey value.
Gain translates the sensor photon conversion output (electrons) into a digital value. The digital value is proportional to the gain set so the number of electrons needed for a unit bit change is proportional to the gain set. White balance is a gain compensation for the differences in the R, G, and B output of a sensor. Auto exposure takes into account the gain changes of white balance.
Exposure time (shutter) determines the amount of time the sensor collects photons and converts them into electrons. It controls how much light is collected by the sensor.
In addition to these features, two additional features, damping and priority control, can be enabled with auto exposure to provide supplementary control over the auto exposure algorithm. The following section on API commands provides additional details.
How is Auto Exposure Set?
The SpinView application and Spinnaker API provide a variety of options for the user to configure auto exposure. For more information on these features, see the camera’s technical reference.
Using SpinView to Enable Automatic Exposure
To enable Automatic Exposure using SpinView:
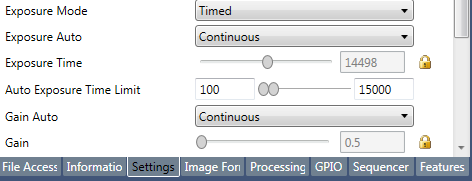
- Open SpinView and navigate to the Settings tab.
- Set Exposure Auto to Continuous.
- Set Gain Auto to Continuous.
You only need to set one of either Gain Auto or Exposure Auto to Continuous. The other can be a fixed value.
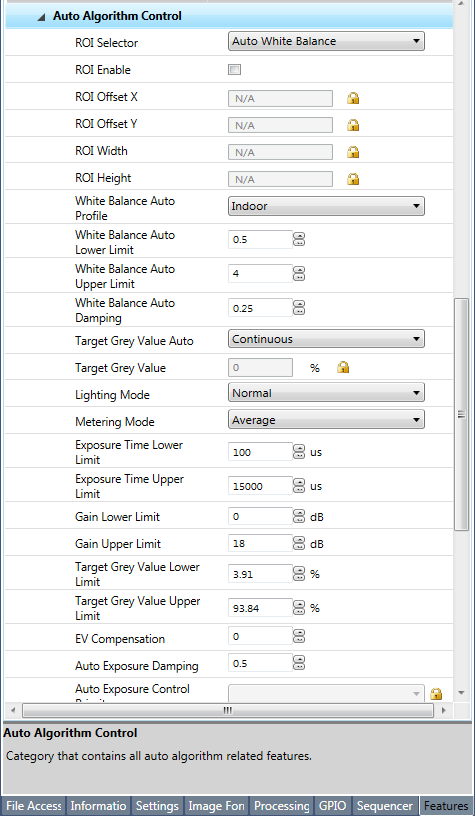
Other optional features that you can set in SpinView are shown below. To access these controls, click on the Features tab and scroll to Auto Algorithm Control. More details on the functions are included in the API controls section.
Using the Spinnaker API to Enable Automatic Exposure Features
Here are the C++ examples for enabling the automatic exposure features using the Spinnaker API, and descriptions of the features. Access these options from the Settings Tab.
Automatic Exposure Time and Gain Auto selects automatic mode.
//Setting Exposure time mode to Automatic
CEnumerationPtr ptrExposureAuto = nodeMap.GetNode("ExposureAuto");
CEnumEntryPtr ptrExposureAutoCts = ptrExposureAuto->GetEntryByName("Continuous");
ptrExposureAuto->SetIntValue(ptrExposureAutoCts->GetValue());
//Setting gain mode to automatic CEnumerationPtr ptrGainAuto = nodeMap.GetNode("GainAuto");
CEnumEntryPtr ptrGainAutoCts = ptrGainAuto->GetEntryByName("Continuous");
ptrGainAuto->SetIntValue(ptrGainAutoCts->GetValue());
Region of interest (ROI) can be applied to the auto exposure features. This AE ROI can be equal to or smaller than the area of the captured ROI.
//light metering: Automatic Exposure ROI
//enabling ROI for white balance
CBooleanPtrptrAasRoiEnable = nodeMap.GetNode("AasRoiEnable");
ptrAasRoiEnable-> SetValue(1);
CEnumerationPtr ptrAutoAlgorithmSelector = nodeMap.GetNode("AutoAlgorithmSelector");
CEnumEntryPtr ptrAutoAlgorithmSelectorAWB = ptrAutoAlgorithmSelector ->GetEntryByName("AutoWhiteBalance");
ptrAutoAlgorithmSelector->SetIntValue(ptrAutoAlgorithmSelectorAWB->GetValue());
//Setting ROI size and offset
CIntptrptrAasRoiHeight = nodemap.GetNode("AasRoiHeight");
ptrAasRoiHeight->SetValue([insert ROI height]);
CIntptrptrAasRoWidth = nodemap.GetNode("AasRoiWidth");
ptrAasRoiWidth->SetValue([insert ROI width]);
CIntptrptrAasRoiOffsetX = nodemap.GetNode("AasRoiOffsetX");
ptrAasRoiOffsetX->SetValue([insert X offset]);
CIntptr ptrAasRoiOffsetY = nodemap.GetNode("AasRoiOffsetY");
ptrAasRoiOffsetY->SetValue([insert Y offset]);
Target Grey Value set to automatic (continuous) allows camera to determine the best mean based on the image variance.
//Automatic Target Grey Value
CEnumerationPtr, ptrAutoXTargetGreyValueAuto = nodeMap.GetNode("AutoExposureTargetGreyValueAuto");
CEnumEntryPtr ptrAutoXTargetGreyValueAutoCts = ptrAutoXTargetGreyValueAuto ->GetEntryByName("Continuous");
ptrAutoXTargetGreyValueAuto -> ptrAutoXTargetGreyValueAutoCts ->GetValue());
Lighting Mode adjusts exposure value to accommodate features in an image histogram when lighting is non-uniform across an image. The standard setting is Normal. The two other options are backlight compensation and frontlight compensation:
Backlight Compensation
Use backlight compensation mode when a strong light is coming from behind the object. In this situation, the auto exposure algorithm underexposes the object. Implementing backlight compensation adjusts the imaging parameters to properly expose the image, regardless of the location of the object relative to the position of the camera and lighting.
//lighting mode: Backlight Compensation
CEnumerationPtr ptrAutoXLightingMode = nodeMap.GetNode("AutoExposureLightingMode");
CEnumEntryPtr ptrAutoXLightingModeBacklight=ptrAutoXLightingMode->GetEntryByName("Backlight");
ptrAutoXLightingMode->SetIntValue(ptrAutoXLightingModeBacklight->GetValue());
Frontlight Compensation
The frontlight compensation mode is used when a strong light is shining in the front of the object while the background is dark. In such conditions, the auto exposure algorithm overexposes the object. Frontlight compensation adjusts the imaging parameters to properly expose the image, regardless of the locations of the object relative to the position of the camera and the lighting.
//lighting mode: Frontlight Compensation
CEnumerationPtrptrAutoXLightingMode = nodeMap.GetNode("AutoExposureLightingMode");
CEnumEntrPtr ptrAutoXLightingModeFrontlight=ptrAutoXLightingMode->GetEntryByName("Frontlight");
ptrAutoXLightingMode->SetIntValue(ptrAutoXLightingModeFrontlight->GetValue());
Metering Mode determines how much of the image is used to calculate the image exposure. Metering Mode can only be selected if Lighting Mode is set to Normal. The options include Spot Metering and Partial Metering.
Spot Metering
This mode measures the light from a small area (about 3%) in the center of the scene while the rest of the scene is ignored. Use this mode when the scene has a high contrast and the object of interest is relatively small.
//light metering: Spot Metering
CEnumerationPtr ptrAutoXMeteringMode = nodeMap.GetNode("AutoExposureMeteringMode");
CEnumEntryPtr ptrAutoXMeteringModeSpot = ptrAutoXMeteringMode->GetEntryByName("Spot");
ptrAutoXMeteringMode->SetIntValue(ptrAutoXMeteringModeSpot->GetValue());
Partial metering
This mode measures the light from a larger area (about 11%) in the center of the scene. Use this mode when very dark or bright regions appear at the edge of the frame.
//light metering: Partial Metering
CEnumerationPtr ptrAutoXMeteringMode = nodeMap.GetNode("AutoExposureMeteringMode");
CEnumEntryPtr ptrAutoXMeteringModePartial = ptrAutoXMeteringMode->GetEntryByName("Partial");
ptrAutoXMeteringMode->SetIntValue(ptrAutoXMeteringModePartial->GetValue());
Target Grey Value Lower Limit and Target Grey Upper Limit allow you to set various auto exposure parameter limits.
//Automatic Target Grey Value limits
CFloatPtr ptrAutoXGreyValueLowerLimit = nodeMap.GetNode("AutoExposureGreyValueLowerLimit");
ptrAutoXGreyValueLowerLimit->SetValue([insert lower limit]);
CFloatPtr ptrAutoXGreyValueUpperLimit = nodeMap.GetNode("AutoExposureGreyValueUpperLimit");
ptrAutoXGreyValueUpperLimit->SetValue([insert upper limit]);
//Automatic Gain limits
CFloatPtr ptrAutoXGainLowerLimit = nodeMap.GetNode("AutoExposureGainLowerLimit");
ptrAutoXGainValueLowerLimit->SetValue([insert lower limit]);
CFloatPtr ptrAutoXGainValueUpperLimit = nodeMap.GetNode("AutoExposureGainUpperLimit"); ptrAutoXGainValueUpperLimit->SetValue([insert upper limit]);
//Automatic Exposure Time limits
CFloatPtr ptrAutoXExposureTimeLowerLimit = nodeMap.GetNode("AutoExposureExposureTimeLowerLimit");
ptrAutoXExposureTimeLowerLimit->SetValue([insert lower limit]);
CFloatPtr ptrAutoXExposureTimeUpperLimit = nodeMap.GetNode("AutoExposureExposureTimeUpperLimit ");
ptrAutoXExposureTimeUpperLimit->SetValue([insert upper limit]);
Auto Exposure Control Priority is used to select whether to adjust gain or exposure first.
Gain Priority Mode
Use this mode to minimize noise. When Gain Priority Mode is selected, the camera keeps gain as low as possible and the exposure time is adjusted according to the target grey level. If the maximum exposure is reached before the target grey level is achieved, the gain starts to increase until the target grey level is achieved.
//gain priority
CEnumerationPtr ptrAutoXControlPriority = nodeMap.GetNode("AutoExposureControlPriority");
CEnumEntryPtr ptrAutoXControlPriorityGain = ptrAutoXControlPriority->GetEntryByName("Gain");
ptrAutoControlPriority->SetIntValue(ptrAutoXControlPriorityGain->GetValue());
Exposure Priority Mode
Use this mode to capture fast motion. When it is selected, the camera keeps exposure time as short as possible and the gain is adjusted accordingly to the target grey value. If the maximum gain is reached before the target grey level is achieved, the exposure time changes until the target grey level is achieved.
//exposure priority
CEnumerationPtr ptrAutoXControlPriority = nodeMap.GetNode("AutoExposureControlPriority");
CEnumEntryPtr ptrAutoXControlExposureTimePriority = ptrAutoXControlPriority->GetEntryByName("ExposureTime");
ptrAutoControlPriority->SetIntValue(ptrAutoXControlExposureTimePriority ->GetValue());