Getting Started with Firefly-DL in Windows
Applicable products
Firefly®-DL
Application note description
This application note describes how to create an inference network file for the Firefly-DL camera using Windows.
Related articles
- Tips on creating Training Data for Deep Learning Neural Networks
- Troubleshooting Neural Network Graph Conversion Issues
- Neural Networks Supported by the Firefly-DL
- Getting Started with Firefly-DL in Linux
Overview
The Firefly-DL is a highly compact, low power consumption machine vision camera that can be trained to detect user-defined objects.
This article goes over the necessary steps to:
- Re-train a pre-trained neural network using transfer learning
- Convert your network to a Movidius-specific format
- Deploy your inference network to a Firefly-DL camera and run "inference on the edge"
Transfer learning is when you take an existing neural network designed and trained for a certain task and re-train part of it to accomplish your task. This approach is much faster than training your own network from scratch and results in an equally good inference network. Once you've deployed your re-trained network onto the Firefly-DL camera, it can apply deep learning on the images that it's streaming - straight on the camera.
If you want to go straight into testing the inference functionality on Firefly-DL, go to Test deep learning with SpinView.
Install and configure system
The process of training a neural network, creating an inference network file and converting it to a format for the Firefly-DL, requires a specific set of software and dependencies to be installed.
To ensure that the software installs and runs properly, FLIR recommends starting with a fresh system, as software conflicts may occur if the software is already installed. If you need to use an old system setup, it is recommend to install everything (except for Spinnaker) in a virtual environment.
The following software is required:
| For Classification (Example 1) | For Detection (Example 2) |
|
|
Windows
FLIR tested Windows 7 and Windows 10.
Spinnaker SDK
The GUI application for camera evaluation SpinView comes included in the Spinnaker SDK. SpinView is required to stream and view inference data on the Firefly-DL.
Spinnaker SDK version 1.25 (or newer) can be found on our website at:
https://www.flir.com/products/spinnaker-sdk/
NeuroUtility
The FLIR NeuroUtility is an easy to use GUI that converts inference network files (meant for PC) into a format that is compatible with the Firefly-DL, and seamlessly uploads the files onto the camera.
Download the NeuroUtility:
https://flir.boxcn.net/s/44ab50jos4y98wo25hej819h3q249ro7
Python
Python is necessary to run the training scripts provided in this application note. When installing ensure to add python to PATH (this option can be checked in the initial install window).
Python can be downloaded from:
https://www.python.org/ftp/python/3.7.9/python-3.7.9-amd64.exe
TensorFlow
TensorFlow is an end-to-end open source platform for machine learning. We use this to create an inference network file to upload to the Firefly-DL. Inference network files are created when retraining a network to use new training data. The following steps show how to use TensorFlow to create a file using an existing neural network, then convert that file to a format compatible with the Firefly-DL.
After installing Python, run the following in command prompt:
py -3.7 -m pip install tensorflow==1.13.2
If your computer has a GPU, run:
py -3.7 -m pip install tensorflow-gpu==1.13.2
to speed up your training process.
TensorFlow for poets
TensorFlow for poets is a tutorial created by Google, which contains scripts that show how to train a new top layer that can recognize other classes of images. Download the zip file and unzip onto your desktop.
https://github.com/googlecodelabs/tensorflow-for-poets-2
Training data
The training data is photos of a variety of flowers: daisies, dandelions, roses, sunflowers, and tulips.
Download the zip file and unzip the flower_photos folder in the tensorflow-for-poets-2-master\tf_files directory.
http://download.tensorflow.org/example_images/flower_photos.tgz
MobileNet-SSD
Link to pre-trained object detection caffemodel and prototxt files, trained to detect humans/faces, among other things (for full details, see accompanying retrained_labels_detection.txt file).
Download the zip file and unzip onto your desktop.
Convert neural networks
The Firefly-DL supports two different types of neural networks: classification and object detection.
Classification indicates the best option from a list of predetermined options; the camera gives a percentage that determines the likelihood of the current image being one of the classes it has been trained to recognize.
Object detection indicates the most likely class given a set of predetermined options. Object detection can also provide a location within the image (in the form of a "bounding box" surrounding the class), and can detect multiple objects in the same image.
Inference network files are created when training (or retraining) a network to use new training data.
Example 1: Classifying flowers (TensorFlow)
This example shows how to use TensorFlow to create an inference network file using a mobilenet neural network, then how to convert that file to a format compatible with the Firefly-DL.
Part 1 Retrain
- Navigate to the TensorFlow-for-poets-2-master folder in file explorer.
- In the folder's address bar, replace the contents with "cmd" then hit Enter. A command prompt window opens in the folder location.
- Copy and paste the following into the command prompt window:
py -3.7 -m scripts.retrain --how_many_training_steps=500 --output_graph=tf_files/retrained_graph.pb --output_labels=tf_files/retrained_labels.txt --architecture=mobilenet_0.50_224 --image_dir=tf_files/flower_photos
| Argument | Description |
|---|---|
| how_many_training_steps | The number of training steps used to train the network. Larger values take more time but provide higher accuracy (diminishing returns applies). You can modify this once you get an inference network file and can see the desired output. We determined 500 to be a good value for this example. |
| output_graph | The output inference network file name and location (used in part 2). |
| output_label | The file name and location for the labels being used for the inference network file (used in part 2). |
| architecture | The neural network being used; can be replaced by any of the variations of mobilenet, except for mobilenet_ssd (see Neural Networks Supported by Firefly-DL for further details). |
| image_dir | The location of the training data (images) being used. You can replace this with custom training data so long as you keep the same folder structure and the training images are in the jpeg format. For example: animals/dog/dogphoto2.jpg. The name of each photo does not matter. |
The files "retrained_graph.pb" and "retrained_labels.txt" are generated in the tf_files folder.
This may take up quite a bit of CPU power and time, depending upon your system.
Part 2 Convert graph file and upload onto camera using Neuro Utility
This step outputs a graph file that is compatible with the Firefly-DL camera.
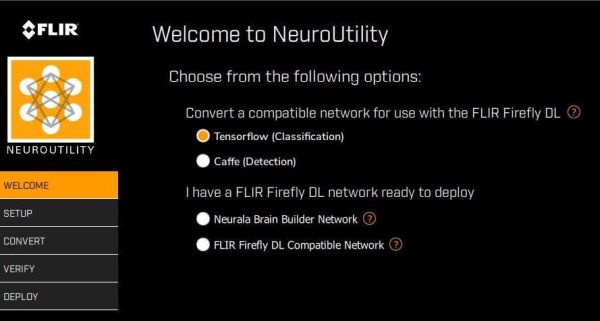
- Launch the Neuro Utility application.
- In the Welcome screen, select TensorFlow, and click continue.
- In the Setup screen, enter the following information about your file:
- Click ... to enter the path to your retrained_graph.pb file.
- Enter the Width and Height of your input images to your network: 224
- Enter the Input Layer Name: input
- Enter the Output Layer Name: final_result
- Enter the Converted File Name: Conv_FFY_DL_Network
- Set Inference Type to Classification.
- Set Camera Save Slot to Slot0 or Slot 1.
- Set Training Pixel Format to RGB8.
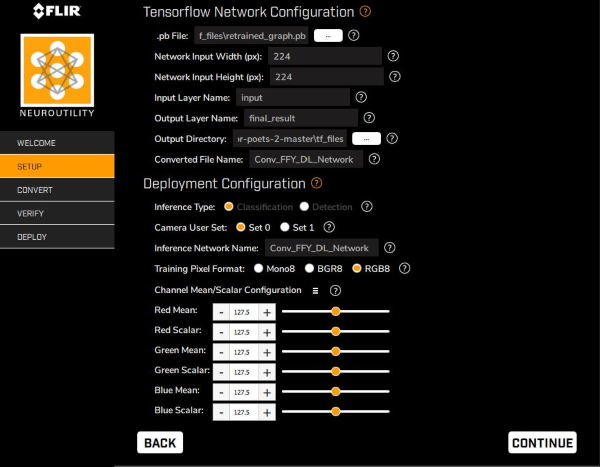
- Click Continue.
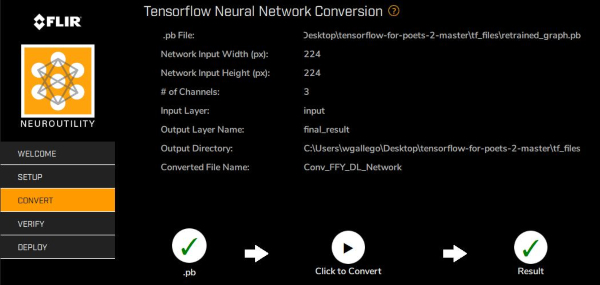
- In the Convert screen, click on the Click to Convert button. Upon completion, a file titled "InferenceNetwork" is in the same folder location as NeuroUtility. Click Continue.
- (Optional) Using the Verification feature, it’s possible to compare the accuracy of the original input model and the converted Firefly-DL inference network file, using the first 15 images in the folder it is accessing (only available for mono cameras).
In the Verify Screen, select the camera and image source. Click on Start to begin verification.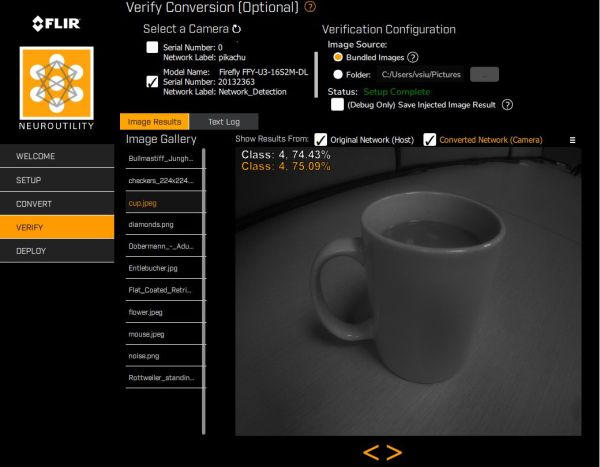
- Choose where to save the file:
Flash - has a slower upload but the file is saved after a power cycle of the camera.
DDR - has a faster upload but the file is lost after a power cycle of the camera.
- Click on the Click to Configure and Deploy icon.
Example 2: People Object Detection (Caffe)
For this example, we demonstrate how to convert the caffemodel and prototext files provided to a Firefly-DL camera compatible inference network file using the NeuroUtility.
Due to the extensive setup involved, we have provided a separate article that goes over training an object detection inference network, titled "Getting Started with Training a Caffe Object Detection Inference Network"; this is currently only available for Linux.
Convert graph file and upload onto camera using Neuro Utility
- Launch the Neuro Utility application.
- In the Welcome screen, select Caffe, then click continue.
- In the Setup screen, enter the paths for the deploy.prototxt and caffemodel files (downloaded from mobilenet- ssd zip file).
- In the Setup screen, enter the following information about your file:
Click ... beside .prototxt File: to enter the path to the deploy.prototxt file (downloaded from mobilenet-ssd zip file)
Click ... beside .caffemodel file to enter the path to the .caffemodel file (downloaded from mobilnet-ssd zip file)
Enter the Converted File Name: InferenceNetwork
Set Inference Type to Detection
Set Camera Save Slot to Slot0 or Slot 1.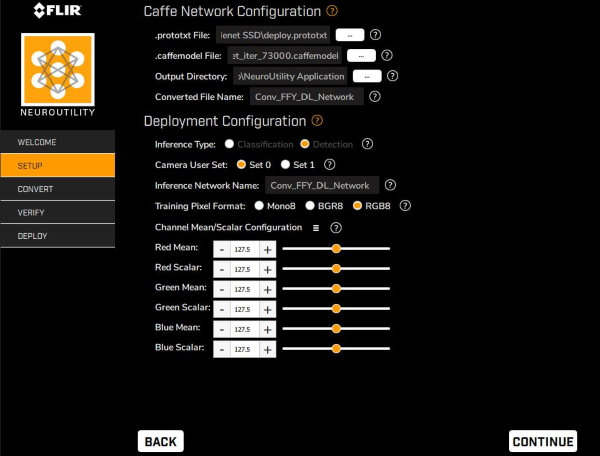
- Click Continue.
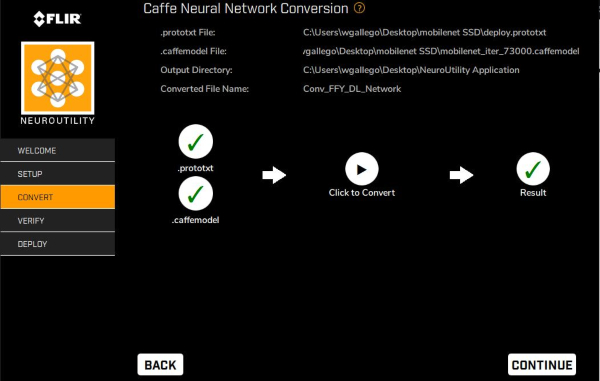
- In the Convert screen, click on the "Click to convert" button. Upon completion, the Inference Network file titled "InferenceNetwork" is created in the same folder location as the NeuroUtility. Click Continue.
- (Optional) Using the Verification feature, it’s possible to compare the accuracy of the original input model and the converted Firefly-DL inference network file, using the first 15 images in the folder it is accessing (only available for mono cameras).
In the Verify Screen, select the camera and image source. Click on Start to begin verification.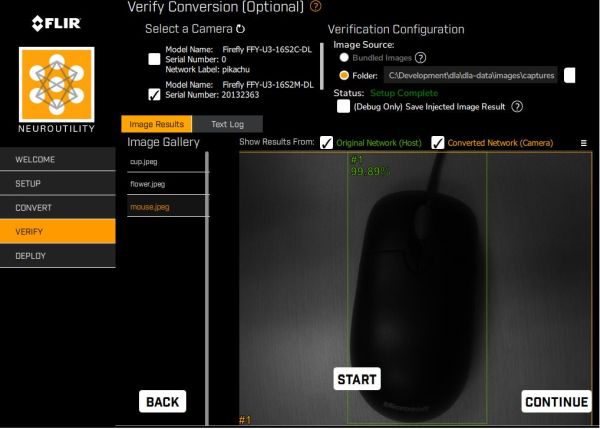
- In the Deploy screen, choose where to save the file:
- Flash—has a slower upload but the file is saved after a powercycle of the camera
DDR— has a faster upload but the file is lost after a powercycle of the camera
- Click on the Click to Configure and Deploy icon.
Test Deep Learning with SpinView
Note: thanks to NeuroUtility, steps 1 to 3 should already be properly configured; users who are following example 1 and 2 can skip to step 4.
- Open SpinView, select the camera, then switch to the inference tab.
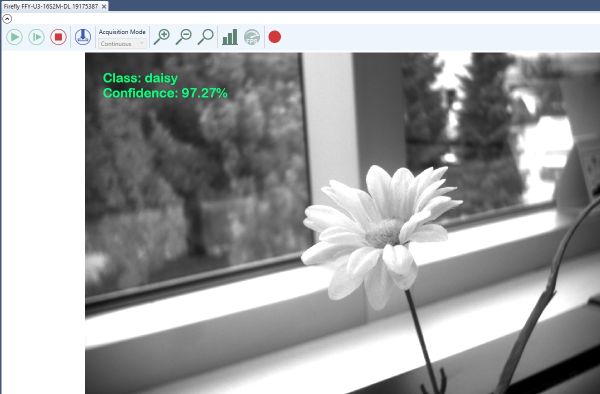
- For example 1 (and preloaded cat and dog network file), ensure network type is Classification.
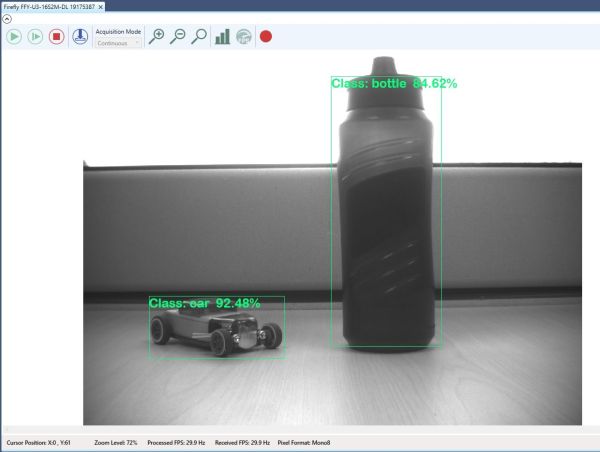
For example 2, ensure network type is Detection. - Select Inference Enable and Chunk Mode Active.
For example 1 (and preloaded cat and dog network file), set Chunk Selector to Inference Confidence, and ensure that Chunk Enable is selected. Set Chunk Selector to Inference Confidence, then also ensure that Chunk Enable is selected.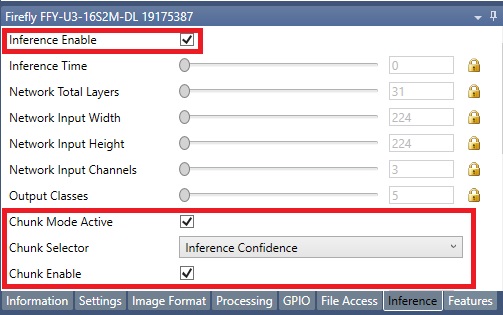
For example 2, set Chunk Selector to Inference Bounding Box Result, and ensure that Chunk Enable is selected. - Right-click on the streaming window, and select Enable Inference Label.
- Click on Configure Inference Label.
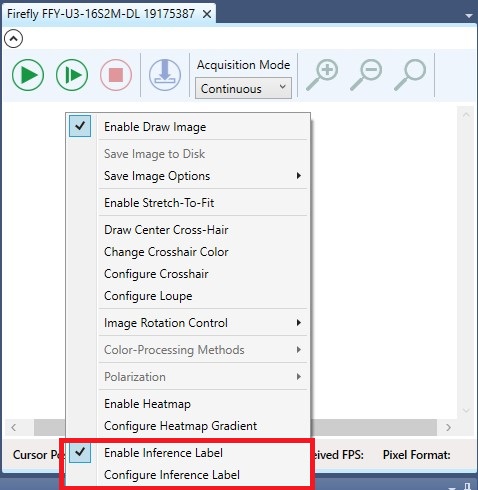
- In the pop up window, click browse to navigate to the label text file and click Apply.
For example 1 (and preloaded cat and dog network file), navigate to the retrained_labels.txt file created in Part 1.
For example 2, navigate to the retrained_labels_detection.txt file downloaded in the mobilenet-SSD.zip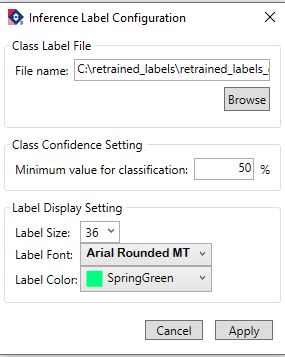
- Click on the green play icon to start camera acquisition.
| Classification | Object Detection |
 |
 |
Artículos relacionados
-
 Aprendizaje profundo
Neural Networks Supported by Neuro on the Firefly-DL
Lea la historia -
Aprendizaje profundo
Tips for Creating Training Data for Deep Learning Neural Networks
Lea la historia -
Aprendizaje profundo
Troubleshooting Neural Network Conversion Errors
Lea la historia